

As some would have known by now, I've been heavily involved in miniature wargaming for the past 6 months, in particular Warhammer 40,000. What a journey this has been! Crazy shit. Check it out:
November 2012: Bought a Warhammer 40K starter kit with paints, a paint brush & some generic space marine models.
November 2012 - January 2013: Mad painting!
February 2013: Full 1,750 point army completed. Painting slows down to focus on the gaming aspect. Still continue painting though, however this is more to buff up my existing army. I was playing games from the very beginning, from measly 500 point games to 1,200 point games, but now, playing is in full swing!1
May 2013: By now I have played almost 30 games in a whirlwind span of 4 months with a fully painted army. I have since added a flyer & several tanks to the ever-growing list. Today, I am proud to say that I have only every played with FULLY PAINTED and WYSIWYG models. Proxies while used once in a while for testing purposes, are quickly replaced with actual painted models.
Anyways, instead of exclusively blogging my hobby like many others before me, I've decided to combine it with my second true love - photography.
Every since I started painting miniatures, I've learned so much in this short period of time. As I was quite proud of what I've been doing, I wanted to document my learning process. This didn't come to fruition due largely to my laziness. However, now I would like to do a painting tutorial of sorts. I'm not a very good painter so I wouldn't call this a painting lesson, but more of a sharing of experiences. It might help some of my viewers out there or it might just amuse them to watch me paint.
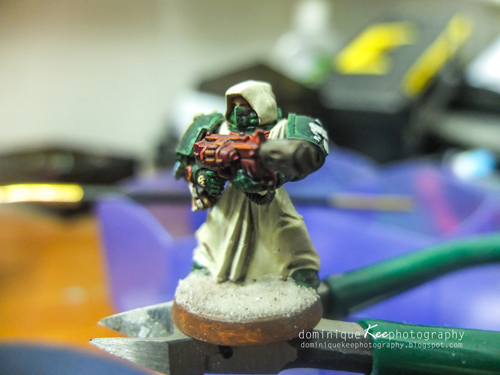
Well, here we go then. I'm currently painting several Dark Angels Veterans with Melta Guns. In popular images, the Dark Angel Veterans wear robes, which made for interesting painting.
1. Prime It
As you can see in the picture below, I'm a 'paint-first-assemble-later' guy. I've primed this model using the Games Workshop White Spray Primer in my effort to retain some brightness in the green armour and the bone cloak.

2. Layer It
After that I've spread out a slightly watered-down layer of Rakarth Flesh, all over the model.


3. Wash It
After the first layer of Rakarth Flesh, I've generously washed the entire model with the Seraphim Sephia wash, making sure I allow some wash to pool in the cloak crevices.


4. Layer It (again)
Once the wash has dried (it may talk a while, so be patient) I put on another layer, this time a carefully applied layer of Screaming Skull for only cloak itself. I use thicker paint, with broad, confident strokes, especially on the edges & large open spaces. Try painting this layer following the lines of the cloak. Feel free to avoid painting the crevices to create an illusion of shadows in the creases of the cloak.
This second layer might take awhile to achieve the effect you want. How much Screaming Skull you put on would depend on the effect you want to achieve.


5. Other Bits
Just like the body of the model, you've also got arms, weapons, backpack and of course, the head. Once again I prime it with white and I layer it in Rakarth Flesh. After that I start painting them all Caliban Green. I then carefully insert in the details (i.e. silver joints, white emblems, etc.)


6. Finishing the Torso
I finish painting the torso and the head. Prior to attaching the 2, I decide to highlight it first. Using a Liner Brush, I highlight the Caliban Green edges with Warpstone Glow. In addition, I highlight the parts in Mephiston Red with Troll Slayer Orange. The cloaked head gets the same treatment. After finishing, I attach the head.


Not long after, the limbs, shoulder plates and weapon goes in. Don't forget to paint in your base and suitably stick your marine on said base. After that I use carpenters white glue (which dries colorless) and fine sand for the base of the model. Oddly enough I paint and attach the backpack last. Just to make sure everything fits in well.
Also don't forget to wash every green, red and silver part of the model with Agrax Earthshade. This gives it a nice gritty look, and not clean out of the wrapper.

7. Completing the Model
I've attached the arms, weapon, shoulder plates, back pack and bases on the model. I've also based the model by first sticking fine sand on it using a layer of white glue. After it dries I paint Mournfang Brown over it, and when that dries, I use a little more glue to stick in the model grass and rocks, etc. The finished work looks something like this.

This isn't so much an instructional post but more to share some of the work I've done in this short time. For beginner painters it may help somewhat, since much of this is a learning process for me as well. I'll put up more of my work once I get the time to document it photographically.
Cheers for now!
For those of you who like statistics:
Vital Stats for May: 2 post 18 pics
Vital Stats So Far: 169 posts 6,274 pics
Disclaimer: The views published in the above photoblog are the author's and the author's alone. If readers are not agreeable with the above views, well, you can bugger-off. All rights are reserved for the the photos and/or articles itself. This article may be reproduced with permission for the author or private or public usage, or other forms of general mayhem. Any unauthorized usage of the images and/or article contained therein is expressly prohibited and violators will be prosecuted with the full force of Malaysian law applicable. Thank you for reading this disclaimer.

